StudPrint Uses LEGO Bricks for Its Frame and Motion System
Adam Turaj’s StudPrint combines LEGO structure and motion parts with standard printer electronics, producing a Benchy in about 75 minutes.
StudPrint puts an unusual constraint at the centre of its mechanical design: use LEGO bricks for most of a working 3D printer’s frame and motion system. Maker Adam Turaj’s machine has printed a Benchy test model in about 75 minutes, showing that the plastic construction can support a functional printer. The result is a project demonstration, though the available performance data is still limited to that single reported print.

A LEGO structure with conventional controls
Turaj developed StudPrint for Infill, a Hack Club project with a target budget below US$350 and a requirement for a custom design. He estimates that about 92 per cent of the printer’s parts are LEGO, counting pieces rather than their weight. LEGO bricks form much of the body and mechanism, with some LEGO components also incorporated into the extruder. Standard electronics and selected conventional mechanical parts complete the assembly.

The structure includes red 2×4 and 2×6 bricks, 15 LEGO wheels and 11 Technic worm gears. Those parts are doing mechanical work, not just serving as a shell: they contribute to the frame and motion system. This makes the design an interesting exercise in adapting a parts ecosystem built for modular assembly to the alignment and movement demands of a printer.
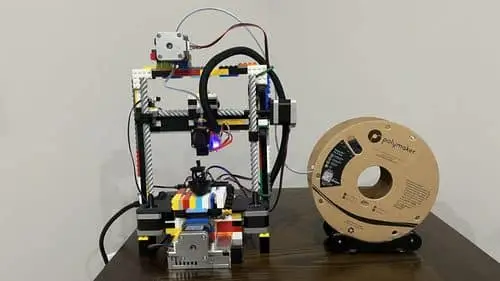
StudPrint uses a bedslinger layout. In this configuration, the bed travels back and forth under the nozzle as one axis moves, while the other axes position the print head and bed relative to each other. That arrangement gives the project a familiar printer architecture, but its performance depends on the stiffness and fit of the assembled structure as well as the motion components. The published information doesn’t provide measurements for frame deflection, positioning accuracy or repeatability, so those characteristics can’t be assessed from the reported Benchy alone.

Electronics and motion hardware
The control system centres on a BigTreeTech SKR Pico V1.0 board, with a Raspberry Pi Zero 2 W running the printer control setup and Klipper firmware. Power comes from a Mean Well LRS-150-24 supply rated at 24V. Five NEMA 17 stepper motors drive the machine: four operate the printer’s axes, and the fifth turns the extruder to feed filament toward the hotend.

A BLTouch probe is included for bed levelling. That gives the machine a familiar tool for measuring the bed surface, while the LEGO-based structure presents a separate mechanical question: how consistently the bed and nozzle maintain their relationship during movement. The available project account identifies the probe and firmware but doesn’t report calibration results, dimensional accuracy or a series of repeatability tests.
The extruder required a change in approach
The first extruder arrangement used LEGO wheels to grip and drive filament. In practice, the wheels didn’t provide enough traction to overcome resistance from the Bowden tube and hotend. That matters because a filament drive has to push material through a constrained path while maintaining a steady feed; slipping at the drive can interrupt extrusion even when the motors and control electronics are working.

Turaj replaced the wheel arrangement with two gears and a spring-tensioning system, increasing the grip on the filament. He later rotated the extruder by 90 degrees to create a straighter filament path. The sequence offers a useful glimpse of the iteration behind the finished mechanism: the LEGO parts could form the assembly, but their arrangement and contact with the filament still needed adjustment to meet the feed requirements.

The change also illustrates a broader design trade-off in adapting modular parts for machinery. A component can be easy to reposition or replace, but its usefulness depends on whether it can provide the required force and maintain alignment in the assembled mechanism. In StudPrint’s extruder, more effective gripping and a straighter route addressed specific sources of resistance. The project description doesn’t provide extrusion-force measurements or long-duration reliability results.
Cost, documentation and practical limits
The listed parts total an estimated US$196.82, including an estimated US$60 allocation for LEGO components. These are the builder’s prices before taxes and delivery, and the parts list is described as subject to price variation and infrequent updates. The project was intended to stay below US$350, but the listed estimate shouldn’t be treated as a guaranteed current cost for another builder.
Availability will depend on what a maker already owns and can source. The parts list identifies LEGO elements using the BrickLink numbering system, and some components are associated with suppliers outside India. Import costs and local availability can therefore change the final outlay for builders there. Makerspaces and college clubs with suitable LEGO pieces and electronics on hand may have an easier starting point.
The build journal records 59.25 hours of work. The documented print result is a Benchy completed in about 75 minutes; no build volume or other print-performance figures are given. The printer has an unheated bed, which limits the range of filaments suited to it. That design choice is a practical boundary for anyone considering the machine: the successful test establishes that it can print, while material range, accuracy and sustained operation remain unreported.
CAD models, build logs and a parts list are available in the project repository, and the hardware design files use the CERN Open Hardware Licence version 2 – Strongly Reciprocal (CERN-OHL-S-2.0). StudPrint is most useful as a documented mechanical experiment: it shows how a largely LEGO construction can carry a printer’s structure and motion system, while its extruder revisions make clear where adaptation was needed. The repository is the place to examine the design details and determine whether the parts and constraints fit a prospective build.
 Choosing Single, Double, Welded Flap and Repair Keder for Fabrication
 Houston Engineering Team Builds a Welcoming Golf Tournament at East River 9
 MIG Transfer Modes: Choosing Between Short Circuit, Spray and Pulse