17 Raspberry Pi Workflow Tips for Faster Terminal, Desktop and SSH Use
Use shell shortcuts, Raspberry Pi OS settings, SSH aliases and SD card images to cut repetitive setup and maintenance work.
Small workflow changes can remove a surprising amount of friction from Raspberry Pi work. Shell completion avoids mistyped commands, Raspberry Pi Imager can prepare a board before first boot, and a few saved shortcuts make repeated access and maintenance tasks easier to manage.
The ideas below cover terminal use, the Raspberry Pi OS desktop, file transfers, command automation and backups. Most take little setup. Their value comes from applying them consistently, especially when you manage several boards or rebuild the same project more than once.
Make terminal work quicker
1. Let Tab complete commands and paths
Type the beginning of a command, filename or directory path, then press Tab. The shell fills in the remainder when there’s a unique match. This is particularly useful when navigating deep directory structures or entering long filenames, where a small typing error can mean starting over.

If more than one completion is possible, press Tab twice to display the available matches. Add more characters to narrow the choice, then press Tab again. Completion saves keystrokes, but it also helps avoid errors in commands where a misspelled path could send you searching for the problem.
2. Search previous commands with Ctrl+R
When you’ve run a command before, use Ctrl+R and type a distinctive part of it. Bash searches the command history and shows a matching entry. Press Enter to run the displayed command.
This is handy for commands with several options or long paths that you don’t want to retype. It works especially well for recurring maintenance tasks. Choose a search fragment that identifies the command you need, and check the match before executing it; history search can return an older command that happens to contain the same text.
3. Rerun a command with sudo using !!
Bash’s !! history expansion stands for the previous command. If a command fails because it needed elevated permissions, you can run sudo !! to repeat it with sudo in front. For example, this can save re-entering a package command or a file-editing command after forgetting the permission prefix.
Because the shell substitutes the previous command, inspect what it is about to run before accepting it. This shortcut is most useful when the preceding command is still the one you intend to repeat.
4. Filter command output with grep
Long command output is easier to work with when you search for a relevant word instead of scanning every line. The pipe character, |, sends one command’s output to another. For example:
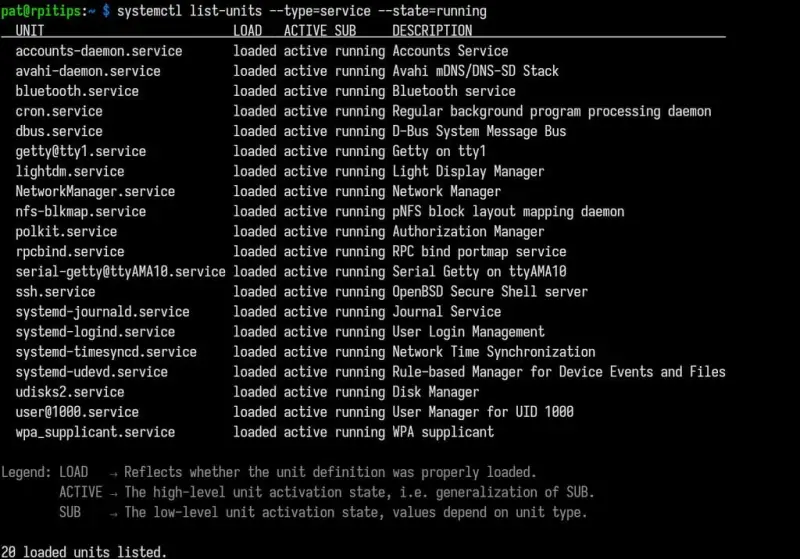
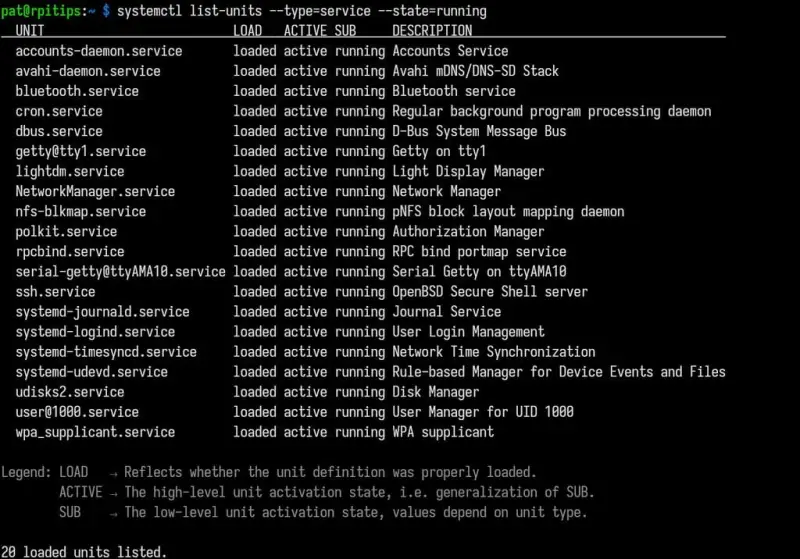
systemctl list-units --type=service --state=running | grep sshThis lists running services, then displays lines containing ssh. Replace that search term with a service name or other text that helps identify what you’re looking for. The same approach can narrow log output or find a line in a script. Remember that grep only finds text that matches the term you give it, so a missing result doesn’t by itself prove that a service or setting is absent.
5. Refresh a measurement with watch
Repeatedly typing the same monitoring command is unnecessary when watch can run it at an interval and refresh the terminal display. To check the Pi’s temperature twice per second, use:
watch -n 0.5 vcgencmd measure_tempThe -n option sets the interval in seconds; changing its value changes how often the command runs. The same pattern works with other commands that report changing system information, such as memory or disk statistics. It gives you a live view in the terminal without manually rerunning the command.
Shape Raspberry Pi OS around your routine
6. Configure desktop keyboard shortcuts
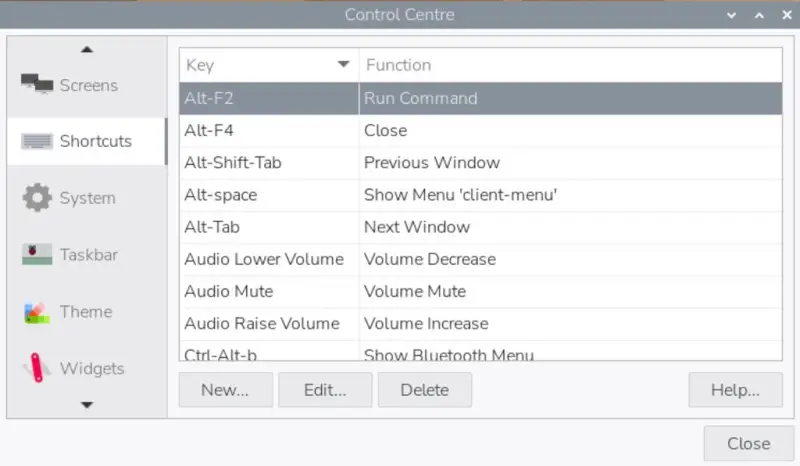
Keyboard shortcuts can make the Raspberry Pi OS desktop faster to navigate. Familiar combinations such as Alt+F4 and Alt+Tab are available, and Win+Return can open a terminal.
Raspberry Pi OS Trixie adds a Shortcuts tab in Control Center, where you can inspect and configure shortcuts, including ones you create yourself. Assign frequently used applications, such as a browser or file manager, to combinations that are easy to remember. The benefit is less time spent opening the Home menu and searching through application entries.
7. Pin commonly used applications
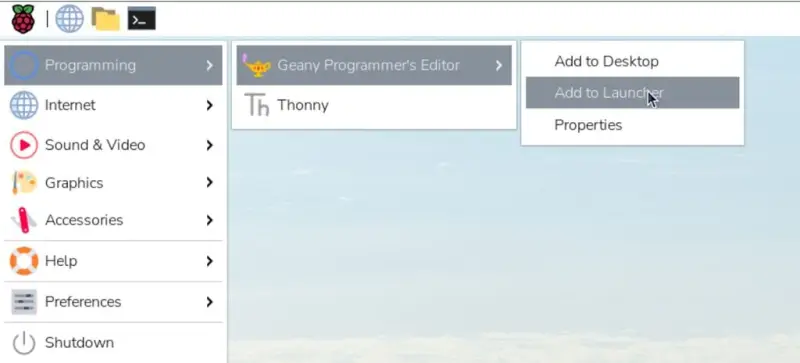
If you prefer clicking to using keyboard combinations, add frequently used programs to the taskbar. In the Home menu, right-click an application and choose “Add to Launcher.” It then appears alongside common desktop tools such as the terminal and file manager.

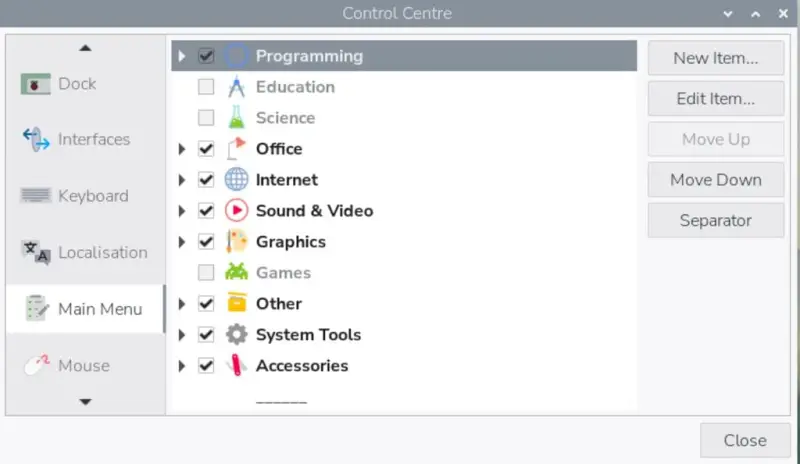
Installed applications usually appear in the Home menu automatically. If a program is missing, or you want to launch a script you wrote, use the Main Menu tab in Control Center to add an entry. Setting up the launcher once after installing Raspberry Pi OS can make day-to-day access to your usual tools more direct.
8. Bookmark web interfaces for Pi projects
Raspberry Pi projects that provide web-based controls can leave you juggling addresses and port numbers. Save each interface as a browser bookmark so you can reopen it without recalling its full address.
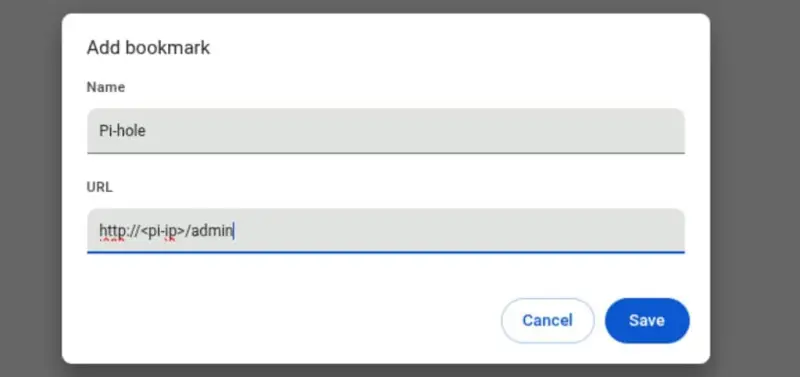
In the browser, you can use the bookmark manager—Ctrl+Shift+O in the browser described here—to add a name and address. Another option is to open the interface and select the star beside its address. Bookmarks then appear in the browser’s bookmark bar or manager. Give each one a useful name, particularly if you use multiple services, so the saved entries remain easy to tell apart.
9. Preconfigure installations in Raspberry Pi Imager
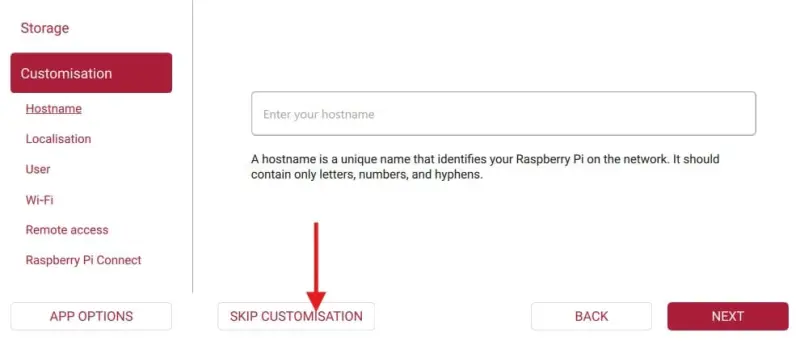
Raspberry Pi Imager’s customization options can move routine setup into the operating-system installation step. Instead of skipping customization and entering the same details after boot, configure a username and password, Wi-Fi credentials and hostname in Imager. You can also enable connection options including SSH, VNC and Raspberry Pi Connect.
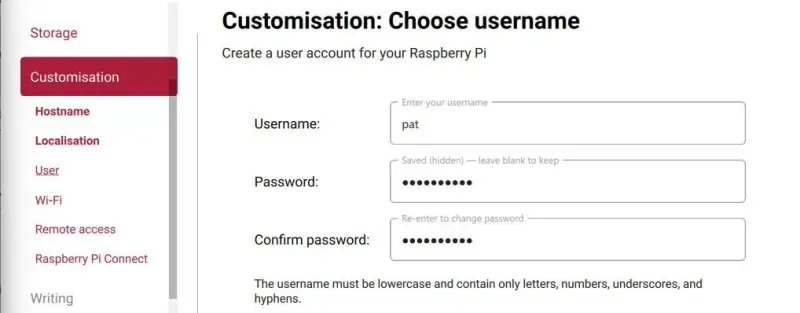
Imager remembers configuration choices, making it easier to repeat a familiar setup on later installations. With these details prepared, a new board can be set up without attaching a display and keyboard just to enter network information, identify its address or assign a hostname. The account and network details still need to be chosen and managed appropriately for the device’s use.
10. Use the file manager for SFTP transfers
Moving files through removable storage can be awkward when a computer and Raspberry Pi share a network. If SSH access is available, the Pi’s file manager can connect to another computer over SFTP. Enter this address in the file manager’s location field:
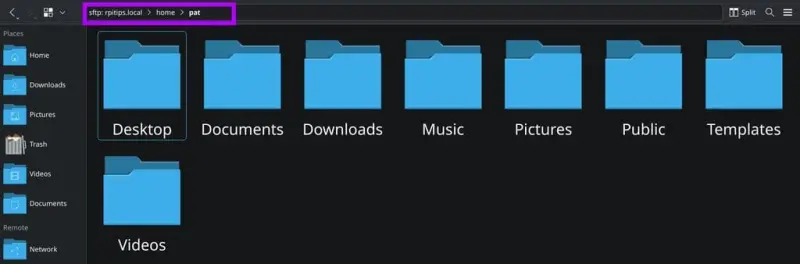
sftp://<User_Name>@<Host_Name_or_IP_Address>Replace the placeholders with the account name and the computer’s hostname or IP address. After connecting, the remote files are available through the file manager, so you can work with them without using SFTP commands in a terminal. The same method can work in the other direction: a Linux computer can use SFTP to access the Raspberry Pi’s files.
Build habits for repeated tasks
11. Create aliases for commands you often use
An alias gives a short name to a longer command. That’s useful when you repeatedly use a command with options that are hard to remember. For example, ls -lah gives a detailed listing that includes hidden files and human-readable sizes. An alias can make that command easier to call.
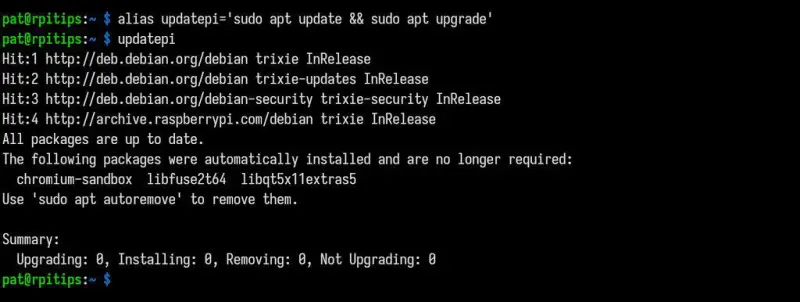
Add aliases to the Bash configuration file in your home directory, then load the updated configuration in your shell. Example aliases include:
alias updatepi='sudo apt update && sudo apt upgrade'alias ll='ls -lah'alias temp='vcgencmd measure_temp'alias diskspace='df -h'alias myip='hostname -I'alias failed='systemctl --failed'
These are examples to adapt to your own routine. In particular, the updatepi alias runs both package-list refresh and package upgrade commands, so invoking it starts both operations. Use names that make the action clear, and keep the underlying command visible in your configuration so it’s easy to review later.
12. Put multi-step routines in shell scripts
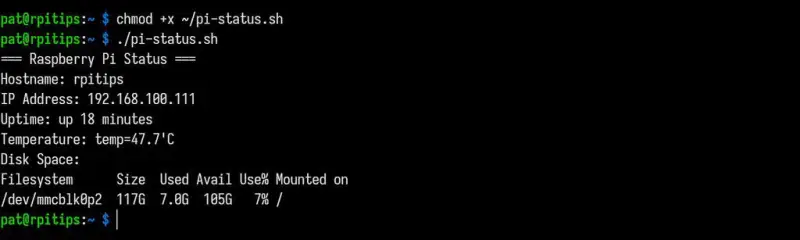
Aliases are good for shortening a command; shell scripts suit tasks that combine several commands or need variables and conditional logic. A status script, for example, can gather the hostname, network address, uptime, temperature and available disk space in one run:
#!/bin/bash

echo "=== Raspberry Pi Status ==="
echo "Hostname: $(hostname)"
echo "IP Address: $(hostname -I)"
echo "Uptime: $(uptime -p)"
echo "Temperature: $(vcgencmd measure_temp)"
echo "Disk Space:"
df -h /
Save the file as pi-status.sh in your home directory and make it executable:

chmod +x ~/pi-status.shRunning the script then prints the collected status information together. The same pattern can package other repeated routines, such as backing up project files or preparing a project environment by installing its dependencies. Scripts reduce repeated typing and put a sequence of actions in one place that you can inspect and update.
13. Add personal scripts to PATH
When a script is ready to reuse, you can avoid typing its full location every time by placing it in a directory listed in the shell’s PATH. To see the directories currently included, run:
echo "$PATH"Put the executable script in one of those directories, and it can be called by its filename from the terminal. Another approach is to keep personal scripts together in a directory such as ~/.scripts, then add that directory to your Bash configuration:
export PATH="$HOME/.scripts:$PATH"Keeping personal scripts in one folder makes them easier to find and back up as a set. After changing the configuration, start a new shell or load the file again for the updated PATH to take effect.
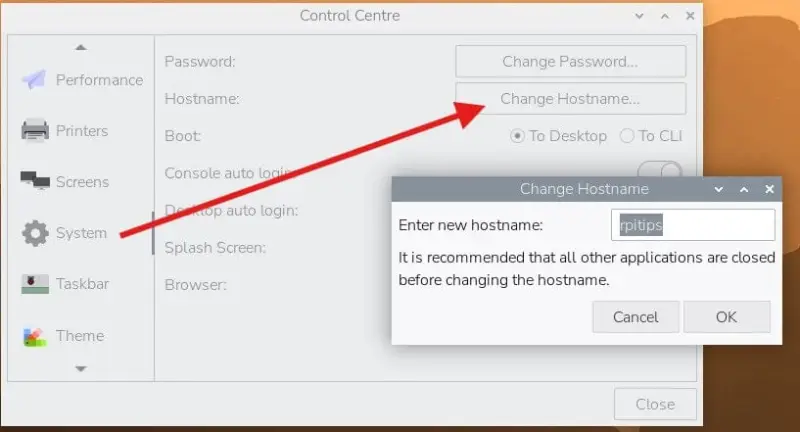
14. Give each board a predictable hostname
A hostname provides a memorable way to identify a Raspberry Pi on a network, so you don’t have to look up its IP address every time you connect. This is especially useful when the network assigns addresses dynamically and the address can change between boots.
Set the hostname during installation with Raspberry Pi Imager’s customization options, or change it later through Control Center. Use distinct, predictable names if you work with more than one board. You can then connect to the intended device by name, provided the network can resolve that hostname.
15. Use SSH keys for repeated connections
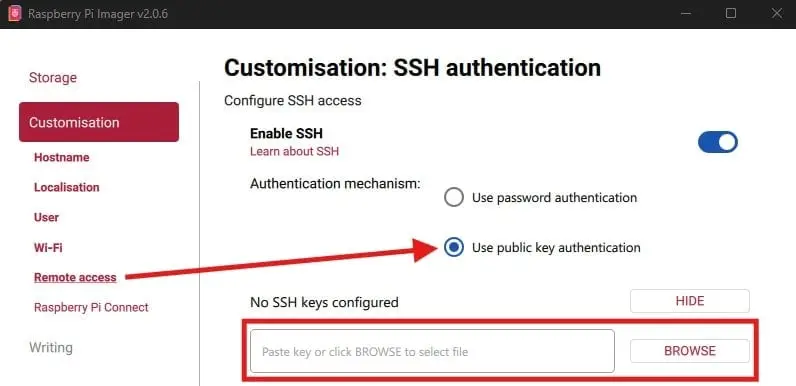
SSH keys let a computer authenticate to a Raspberry Pi using a key pair, avoiding a password prompt for each connection once the setup is complete. The private key stays on the computer initiating the connection; the corresponding public key is installed for the account on the Pi.
One way to prepare the connection is to create keys on the main computer and add them to the Raspberry Pi through Imager. Once configured, key-based access can make routine SSH sessions quicker, and it also allows scripts to connect without stopping to request an account password. Keep the private key protected: it is the credential that identifies the connecting computer.
16. Save connection settings as SSH aliases
If you connect to several Raspberry Pis, an SSH configuration entry can store the hostname, account and port for each device. Instead of typing a full command such as ssh -p 222 pat@rpitips, define a short name in ~/.ssh/config:
Host rpitips
    HostName rpitips
    User pat
    Port 222
You can then connect with ssh rpitips. Add an entry for each machine and give each alias a name that distinguishes the device. This keeps connection details in one configuration file and reduces the chance of mixing up usernames, hostnames or ports.
17. Keep an SD card image for projects you may rebuild
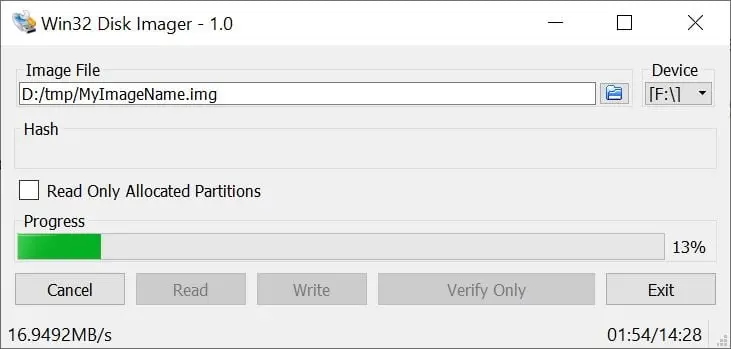
An SD card image is a file containing a copy of the card’s contents, including the installed software and project configuration. Keeping an image of a working project gives you a way to restore that setup if the card fails or you want to return to an earlier project state.
Linux tools such as dd and Windows software such as Win32 Disk Imager can create card images. When finishing one project before starting another, save an image of the completed setup, then reuse the card. Restoring the saved image brings back the earlier configuration and applications, avoiding a rebuild from scratch.
Creating an image takes time and storage, so it makes most sense for projects you expect to revisit or setups that would be tedious to reproduce. A small library of named images can make a Raspberry Pi easier to repurpose while preserving known working configurations. Combined with shell shortcuts, saved desktop access and predictable SSH connections, that habit shifts time away from repeated setup and back toward the project itself.
 Choosing Single, Double, Welded Flap and Repair Keder for Fabrication
 Houston Engineering Team Builds a Welcoming Golf Tournament at East River 9
 AMD Venice Uses 2.5D Packaging to Feed Higher Bandwidth and Split I/O Designs